SupportCentre Overview
The SupportCentre is used to securely communicate and share documents between the QuantityWare team and you.
For any QuantityWare queries, please use the SupportCentre to get in touch.
Updated In October 2025
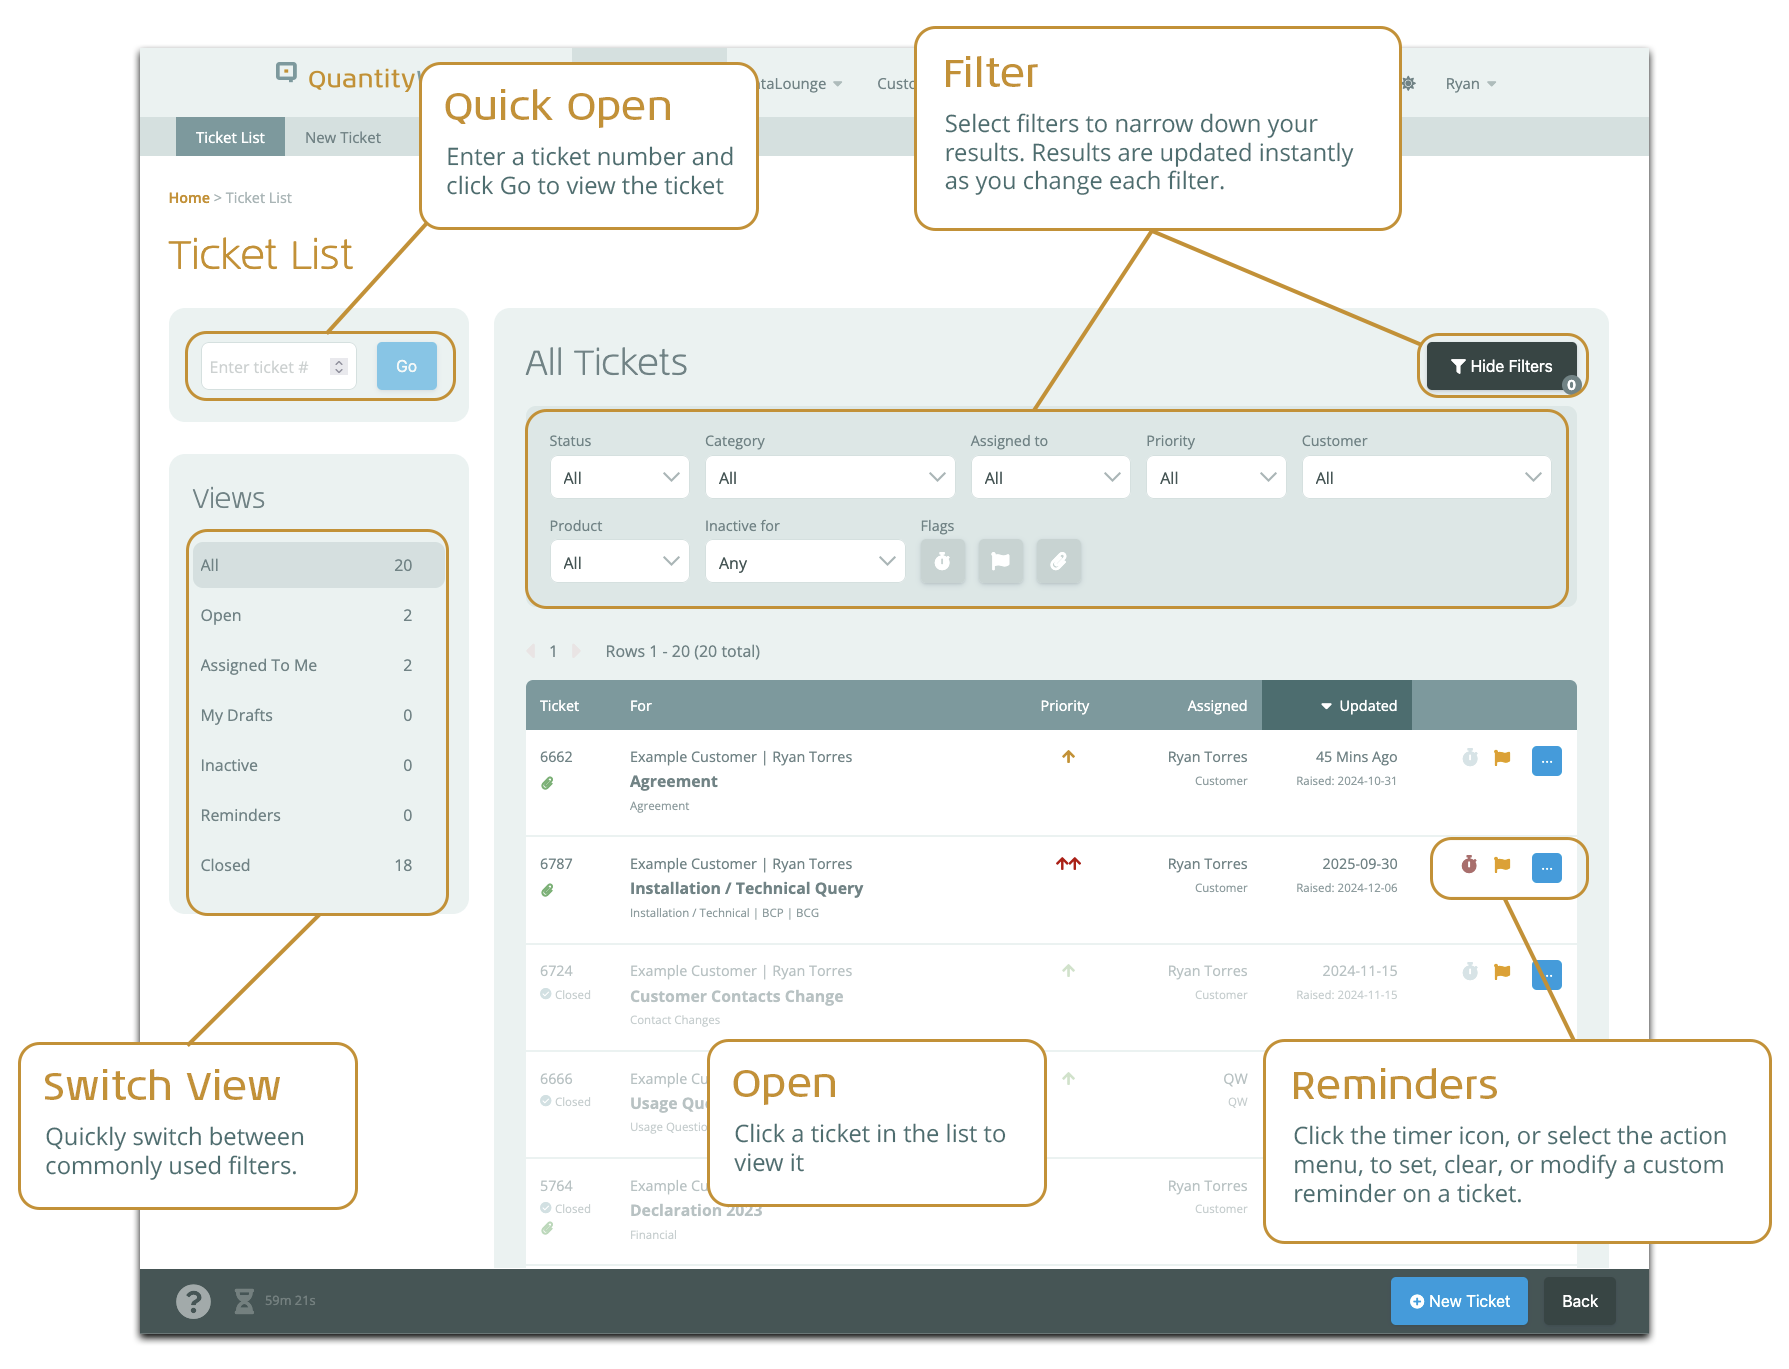
The Ticket List has been updated in October 2025 to support more advanced filtering, “views”, automatic refreshing, and the ability to set reminders on Tickets. This is documented below.
Viewing Existing Tickets
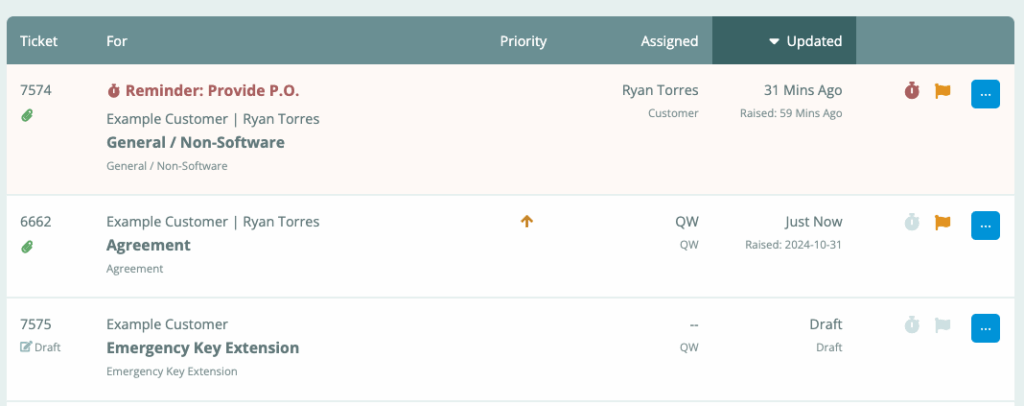
The SupportCentre contains a list of all outstanding tickets belonging to your organization(s), along with any tickets you’ve begun to raise but are still in draft form.
You can access the Ticket List as follows:
- Click “SupportCentre” in the navigation menu
- Select “Ticket List”
The Ticket List will display. Click on any ticket listed to view it.
You can filter the ticket list, and perform quick configuration actions on the ticket, as outlined below:
Automatic Refreshing
Since the October 2025 update, the Ticket List will automatically refresh within five seconds of a ticket being changed. You no longer have to manually refresh the list, or set specific refresh intervals.
Filtering
Use the filters at the top of the list to narrow down the list of tickets shown. If the filters aren’t shown, click the “Show Filters” button to the top of the list.
You can filter on the following:
- Status
- Category (e.g. Agreement, General / Software)
- Assigned To (e.g. You, QuantityWare)
- Priority
- Customer (if applicable)
- Product (BCP, BCG, and/or QAPI)
- Inactive For (e.g. 4 weeks)
- Tickets you have a set reminder on
- Tickets you are following
- Tickets with one or more attachments
Views
Views are sets of predefined filters, which allow you to quickly switch between common sets of filters. These are:
- All – All tickets
- Open – All open tickets
- Assigned to Me – Open tickets assigned to you
- My Drafts – Your draft tickets
- Inactive – Open tickets with no activity for 4 weeks or more
- Reminder – Tickets you have set a reminder on
- Closed – All closed tickets
Reminders
You can set a custom reminder if you wish to be reminded to follow-up a particular ticket on a specific date.
When the reminder is hit, the Portal will send you a reminder email, and the ticket will appear at the top of the ticket list, highlighted.
More details are shown in Managing Reminders.
Submitting a Ticket
To submit a ticket to the QuantityWare team, please follow the steps below:
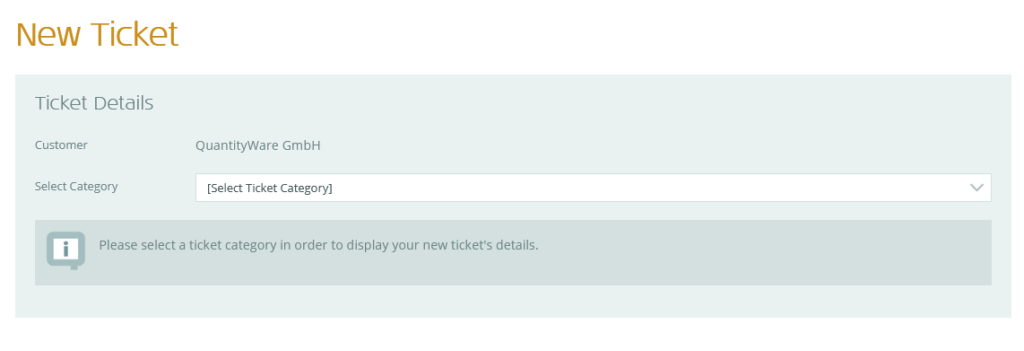 Create a new ticket, by doing one of the following:
- From any screen, select “SupportCentre” in the navigation menu, then select “New Ticket”
- From the Ticket List, click the “+ New Ticket” button
The “New Ticket” screen will be displayed (see right):
- Select a customer (if applicable – this is only available if you have roles across multiple customers)
- Select a category (see Ticket Category List later in this section)
- Select the QW Product(s) (if applicable – this is only available for certain technical categories of ticket)
 The screen will refresh, and some additional information will be displayed (see left).
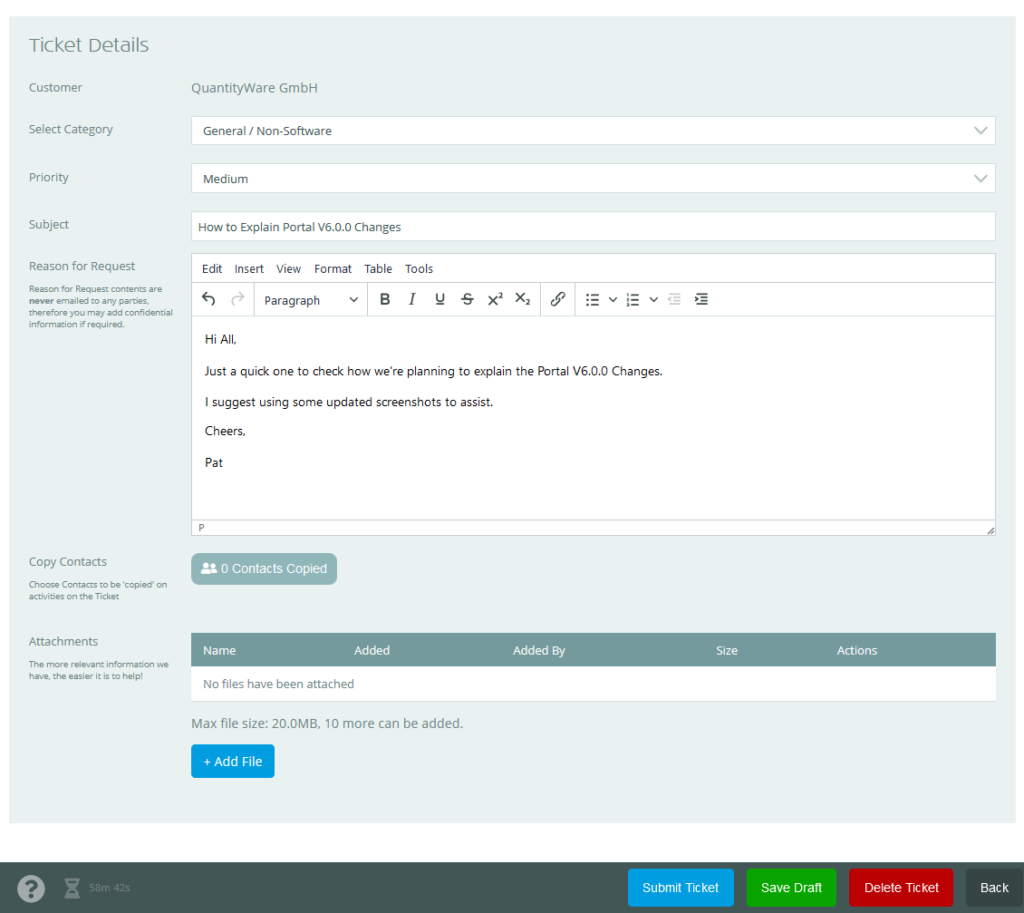
You’ll see a Subject field, along with a Details / Comments text area, and, optionally (depending on Ticket Category), the following additional items:
- System drop down field
- “0 Contacts Copied” button
- “Attachments” section
A new “Submit Ticket” button will be available at the bottom of the screen.
To complete and submit the ticket:
- Set the priority (if required)
- Change the default subject so that it provides a better summary of your inquiry
- Select a system (if applicable – this is only available for certain technical categories of ticket)
- Enter the details of your inquiry.
NOTE: Please make this as descriptive as possible – the more detail you provide, the faster we’ll be able to resolve your issue and it will reduce the chance of us needing to ask you further questions.
- Copy your colleagues if desired, by clicking the “0 Contacts Copied” button and selecting the required colleagues:
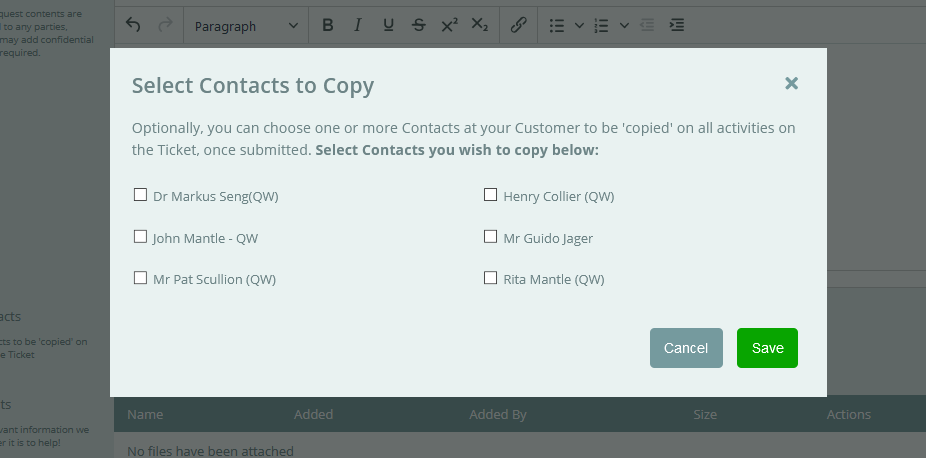
NOTE: Copied Contacts will always receive notification emails regarding changes or comments on the Ticket, once raised. The list of Copied Contacts can be modified once the Ticket is raised, if desired.
- Attach any supporting documentation (if applicable) by clicking “+Add File” to select a file, or dragging+dropping file(s) on the page. Repeat this process as needed.
File Checksums
- It is vital that the files you provide are protected against modifications after upload, during the download process (a “man in the middle” attack), or after downloading.
- To help achieve this, we use file checksums.
- Learn how to ensure the integrity of your downloaded files in our File Checksums article
- Optionally, set a reminder for this ticket (see Managing Reminders)
- Click “Submit Ticket” in the Action bar to submit your ticket to the QuantityWare team.
You’ll receive an email to confirm that your ticket has been submitted. You can view your ticket at any time via the Ticket List. See below for more details regarding viewing – and replying to – tickets.
Saving your Ticket
- If you wish to save your ticket but not submit it yet, click “Save Draft” (and click “Cancel” if prompted to submit).
- This will save your ticket as a draft, which you can later access via the Ticket List and submit (or delete!) as required.
Deleting your Ticket
- If you don’t wish to keep your ticket, you can permanently delete it (and any attached files) by clicking the “Delete Ticket” button and confirming.
Ticket Notifications
Whenever actions occur on a Ticket that is assigned to you, you’ll receive an email to your primary email address (this matches the email address you log into the Portal with).
These actions include:
- Ticket assignment (to you)
- Comment addition
- File(s) addition
- Status change (e.g. closing)
Each notification email contains a direct link to the ticket.
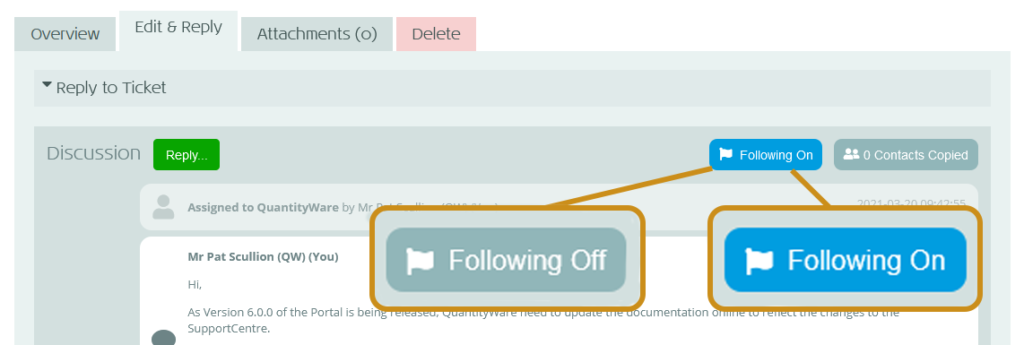
“Following” a Ticket
Actions on a Ticket are usually only sent in a notification email to a person if the Ticket is assigned to that person.
However, you may choose to “follow” a Ticket, which will ensure you receive notification emails for actions on a Ticket, regardless of assignment.
By default, you will be set to follow any Ticket you raise.
You can also enable/disable following within a Ticket by navigating to the Edit & Reply tab and clicking the “Following On” / “Following Off” button:
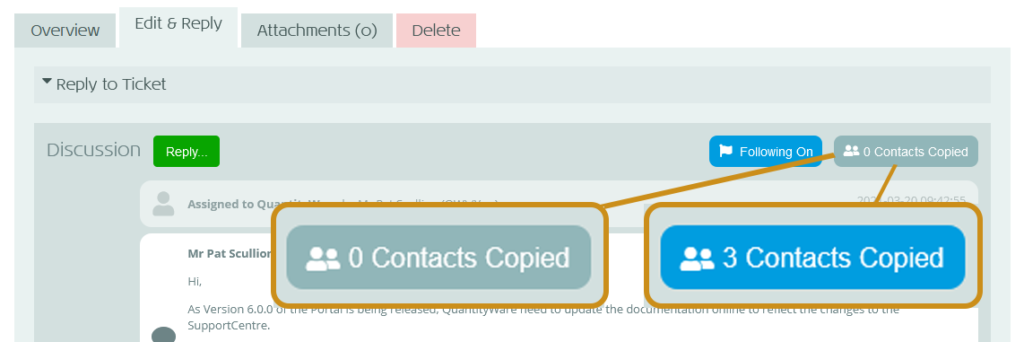
Copying Contacts on a Ticket
As described in the “Submitting a Ticket” section above, you may choose to copy your colleagues on a Ticket if desired.
In a similar fashion to following, a Copied Contact will always receive notification emails regarding actions on the Ticket, regardless of assignment.
You (and your Customer colleagues) may change the list of copied contacts in a Ticket by selecting the “X Contacts Copied” button and selecting / deselecting colleagues as required:
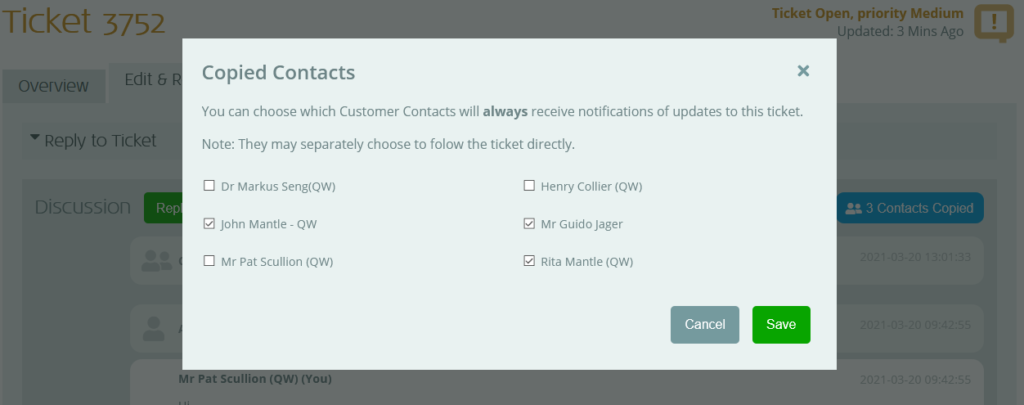
NOTE: As of V9.0.0 (Feb 2025), adding / removing someone from the Copied Contacts list and clicking “Save” will send the Contact an email informing them they have been added/removed from the copied contacts on the ticket.
Viewing/Editing a Ticket
To view/edit any ticket, either click the link in a notification email for the ticket or perform the following steps:
- Click “SupportCentre” in the navigation menu
- Select “Ticket List”
- Find the ticket you require (using the filters if required)
- Click on the ticket to view it
The ticket will now be displayed, ready for you to view, reply to and/or make changes to:
Ticket Tabs
There are various tabs on the ticket, each providing certain information / functionality:
- Overview – This provides you with a simple summary of the ticket
- Edit & Reply – Use this to view all comments and changes, add replies and files, reassign, modify the priority or close the ticket.
- Attachments – Download, and delete existing attached files on the ticket
- Delete – Permanently delete the ticket (only available for tickets you have raised)
Status Panel
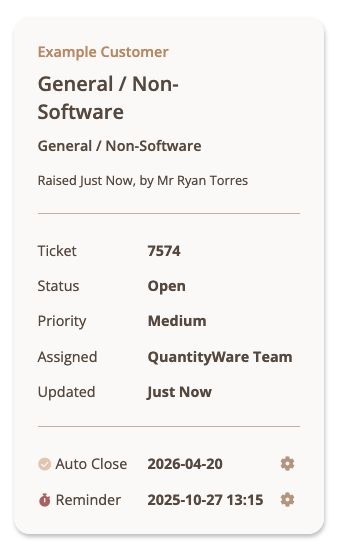 A status panel is shown to the right of the ticket, which provides an overview of the ticket (see right), including:
- Customer
- Subject / category
- Raise date / contact
- Ticket number
- Status
- Priority
- Current assignment
- Last updated
- Auto-close status
- Custom reminder (see Managing Reminders)
It is always shown on screen, allowing you to view the ticket summary across all the tabs. It is automatically updated whenever actions are performed on the ticket.
Editing / Replying to a Ticket
To edit and/or reply to a ticket, perform the following steps:
- Open the Ticket (see “Opening a Ticket”)
- Click the “Edit & Reply” tab
The Edit & Reply tab will be displayed, showing the discussion / history of the Ticket:
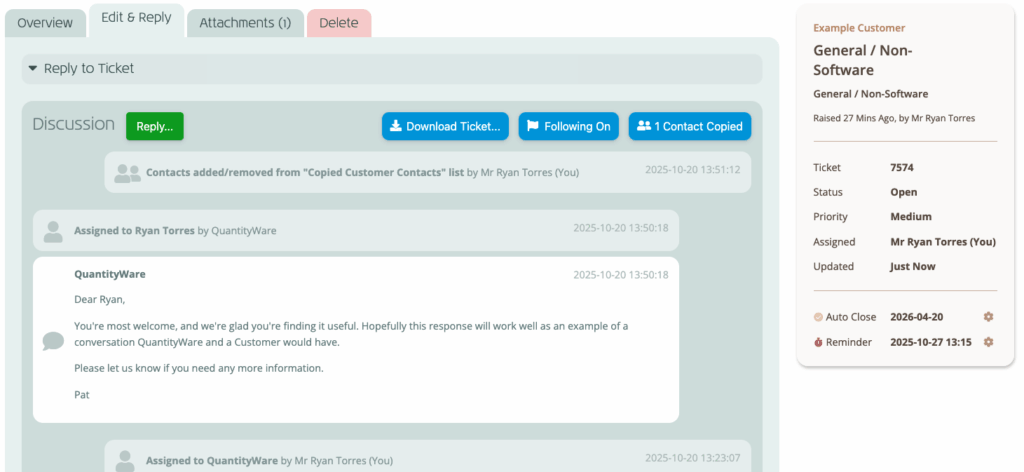
- Click the “Reply…” button
The Reply panel will be displayed:
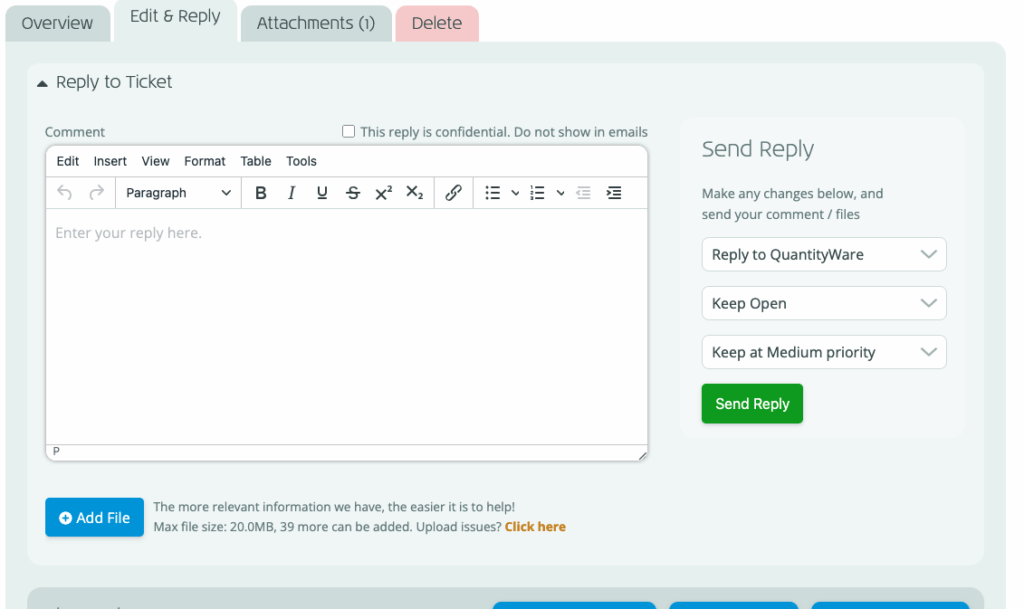
- Add your comment (this is required if making any other changes)
- Optionally, attach any supporting documentation by clicking “+Add File” to select a file, or dragging+dropping file(s)into the Reply panel. Repeat this process as needed.
- Optionally, change who the ticket should be assigned to using the “Assign to” drop-down list. You can assign it back to QuantityWare, or to another contact at your customer (e.g. if we have requested an action, and you need to pass the ticket to the team member who needs to perform it)
Default Ticket Assignment
- If you open a ticket that’s assigned to you, then by default the ticket will be set to reply to the person who assigned you the ticket.
- If you open a ticket that’s assigned to another person, then by default the ticket will be kept assigned to the other person when saved.
- Optionally, change the ticket status (you can close a ticket using this method – or reopen a ticket if required)
- Click “Reply”
Your reply, along with any changes to the Ticket status and files, will be instantly added to the Ticket Discussion.
Any other Contacts currently viewing the Ticket will see your changes immediately. You will also see any changes made by other Contacts on the Ticket as soon as they make them.
Downloading Attachments
You can download files either via the Edit & Reply or the Attachments tab:
- The Edit & Reply tab lists any files added in chronological order, along with all other messages in the conversion
- The Attachments tab lists all files attached to the Ticket in a simple list
From the Edit & Reply tab
Perform the following steps:
- Open the Ticket (see “Opening a Ticket”)
- Click the “Edit & Reply” tab
- Scroll to your attachment
- Click on the attachment to download it
From the Attachments tab
Perform the following steps:
- Open the Ticket (see “Opening a Ticket”)
- Click the “Attachments” tab
- Click on the attachment to download it
File Checksums
- It is vital that the attachments we share with customers are protected against modifications after upload, during the download process (a “man in the middle” attack), or after downloading.
- To help achieve this, we use file checksums.
- Learn how to ensure the integrity of your downloaded files in our File Checksums article
Customising Downloaded File Names
You can choose to include the Ticket number in the file name of each downloaded attachment.
This is configurable in the My Profile page, via the Settings tab.
Downloading a Ticket to PDF
Some organizations may require offline copies of correspondence in the QuantityWare Portal between the organization and QuantityWare.
Since V6.9.0, the Portal supports this functionality, allowing a full copy of a Ticket and its history to be downloaded as a PDF.
To to this, perform the following steps:
- Open the Ticket (see Opening a Ticket)
- Click the “Edit & Reply” tab
- Click the “Download PDF” button (at the top of the Discussion)
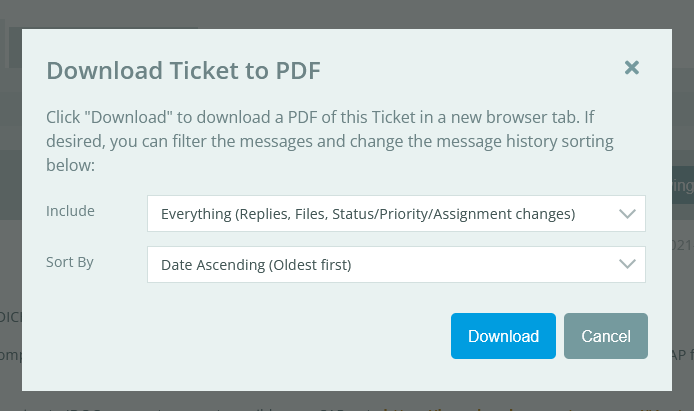 The “Download Ticket to PDF” dialogue will display (see right).
- Optionally, use the “Include” list to filter the messages included in the download. The options are:
- Everything (Replies, Files, Status/Priority/Assignment changes) (Default)
- Replies and Files only
- Replies only
- Optionally, use the “Sort by” list to change the order of messages shown
- Click “Download”
A new tab will be opened and a PDF copy of the Ticket will be displayed after a few seconds. This PDF can be saved or printed as required.
Deleting a Ticket
If you raised a ticket in error and wish to permanently delete it, perform the steps below to delete it.
- Open the Ticket (see Opening a Ticket)
- Click the “Delete” tab
- Click “Delete Ticket”
- Click “OK” in the confirmation dialogue
The ticket will be permanently deleted, and you will be returned to the Ticket List.
Close Ticket Instead?
- Deleting a ticket permanently removes the ticket and any attachments from the SupportCentre, so only do this is you are certain you will not need to refer to it in future.
- If the ticket has been actioned (or rejected) and you wish to close it, set the Status to “Closed” via the Edit & Reply tab instead.
Managing Reminders
Since October 2025, you can now set reminders on tickets that you wish to follow-up on a future date.
These are personal to you only, and will only be sent to you. Each contact on the Portal may set their own reminders as required.
Setting a Reminder
You can set a reminder on a ticket from the Ticket List, the New Ticket screen, and the Edit / View Ticket screen.
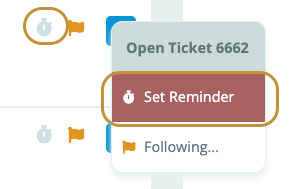
- On the Ticket List, either click the reminder icon on the ticket, or right-click / select the action menu for the ticket and click “Set Reminder”:
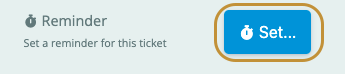
- On the New Ticket screen, click the “Set…” button at the bottom of the ticket:
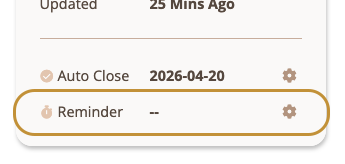
- When viewing an existing ticket, click the reminder line in the action panel:
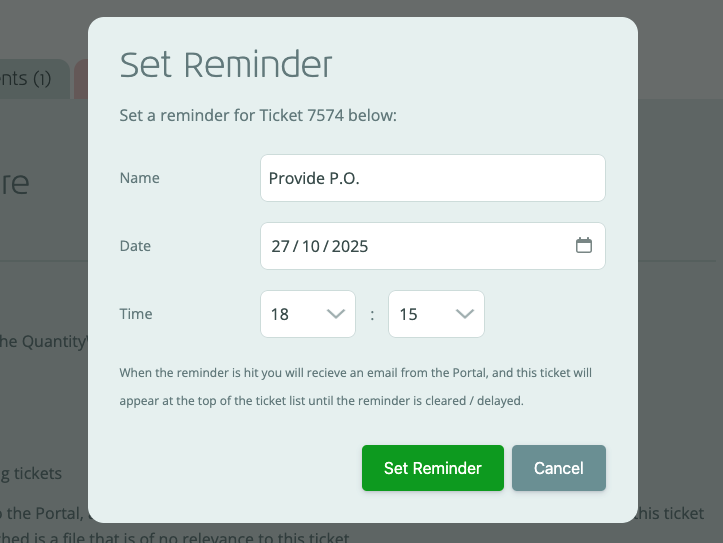 These will show the “Set Reminder” panel (see right).
This allows you to configure the reminder name, date, and time (in 15 minute intervals).
By default, the reminder is set with the name “Follow Up”, and is set to one week in the future.
Make whatever changes you require to the reminder and click “Set Reminder” to set it.
Identifying Tickets with Reminders
Tickets with reminders set show the reminder icon in red:

To view only tickets with Reminders set you can use the reminder filter, or choose the “Reminder” view, on the Ticket List.
Hitting a Reminder
When a reminder is hit:
- An email is sent to you from the Portal
- The ticket will be highlighted at the top of the Ticket List:
Modifying a Reminder
You can modify a reminder by clicking the reminder icon / menu item / action panel (as per Setting a Reminder above).
This will show the Reminder Actions Menu, which allows you to:
- Clear the reminder
- Delay / snooze the reminder by 1 day
- Delay / snooze the reminder by 1 week
- Edit the reminder
Automatic Reminder Clearing
When a ticket is closed, any reminder on the ticket will be automatically cleared.
Ticket Category List
To help us quickly address your queries, selecting the appropriate ticket category is important. Please see below for a list of the ticket categories available:
- Agreement – Discuss matters relating to agreements / contracts with QuantityWare
- Calculation Issue – Report BCS calculation issues and request assistance in resolving calculation issues
- Consultant Enquiry – Discuss consultant-specific matters. Only available to certified QuantityWare Consultants
- Development – Ask questions relating to the development of QuantityWare-supported solutions
- Financial – Discuss matters relating to invoice payments and financial arrangements
- Installation / Technical – Request assistance with installation and configuration of QuantityWare
- Portal Issue – Report any errors or difficulties you experience when using the Portal
- Security – Discuss issues regarding security
- System Limit Change – Request an increase (or decrease!) of the maximum systems permitted for your organization in the Portal
- Test Agreement Extension – Request a short extension of usage keys on a test agreement (available to those with technical role)
- Trial Usage Key Extension – Request a short extension for trial usage keys on a productive (usage) agreement (available to those with technical role
- Emergency Key Extension – Request a four week extension of your license keys
- General / Software – Questions on BCS functions and features
- General / Non-Software – For all other matters
Some tickets can’t be directly accessed via the SupportCentre. These are listed below:
- Contact Changes – To request changes to contacts, use the Contacts Manager (Customer → Contacts Manager) to make the required changes and click “Request Changes”
- Installation Addition – To request additional installations, use the Systems Manager (Customer → Systems Manager) to add your desired installations, add a reason for the addition and click “Save Changes”
- Usage Questionnaire – To submit your organization’s annual questionnaire, use the online Usage Questionnaire form (Log In Page → Usage Questionnaire) to submit an updated questionnaire.
Can’t Find a Category?
Depending on the role you’ve been assigned for your customer, and whether your customer’s agreement is invalid, some of the options above may not be available.
Back to Service Portal Guide